-40%
TIPM Plug-In Fuel Pump Relay Bypass/Test System:2007-2018 Dodge/Chrysler/Jeep/VW
$ 73.39
- Description
- Size Guide
Description
Our TIPM Plug-In Fuel Pump Power Bypass/Test System (US Patent #10,139,450) is a reliable, long-term solution to bypass faulty fuel pump relays on many 2007-2018 Chrysler/Jeep/Dodge/VW vehicles (see vehicle list below). This device can bypass a faulty fuel pump relay to continue driving normally, test your fuel pump when the vehicle is off, test your fuel pump relay, and disable the fuel pump as a optional security measure. Installation is easy and takes less than 15 minutes.There is no need to cut harness wires, remove the TIPM, visit your dealer, or reprogram the TIPM.
It comes with a 30 day return policy for a full refund on the part and a 2 year warranty, so there is no risk if you find the fuel pump relay is not the actual problem. Unlike TIPM cables which are
temporary
solutions, this part was designed by our engineers as a patented
long term
alternative to purchasing a new or used TIPM.
If your vehicle fails to start (acts likes it's out of gas) and/or your fuel pump continues pumping after turning the vehicle off (draining your battery), you likely have a faulty fuel pump relay. Fuel pump relays are soldered to one of six circuit boards located deep inside your fuse box (TIPM), so they are very difficult to access and change. Our company, Vertical Visions LLC, is a Maryland small business that is owned and operated by an engineer who specializes in TIPM and fuel pump relay problems since 2014. We also invented the temporary TIPM test/bypass cable in 2014.
Symptoms of Faulty Fuel Pump Relays
The fuel pump relay, located deep inside the TIPM, is the most common relay to fail since it's powered 100% of the time while you're driving. You likely found us because your dealer wants to change your fuel pump (0+) or TIPM (00+). Symptoms include:
Multiple attempts to start, occurring most often in the morning when the vehicle is cold. The problem gets worse over time and eventually won't start at all.
Unexplained battery drainage due to a relay that is stuck in the closed/on position. You can likely hear the fuel pump running if listening from the rear of the vehicle after it's turned off. Battery drainage may still occur even after a new battery or fuel pump is installed.
The vehicle stalls while driving and you coast to a stop. This situation is sometimes fuel pump relay related.
The vehicle won't start and appears to be out of gas.
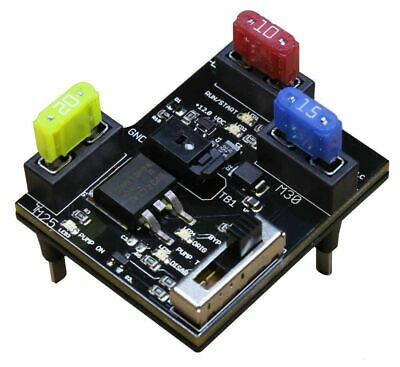
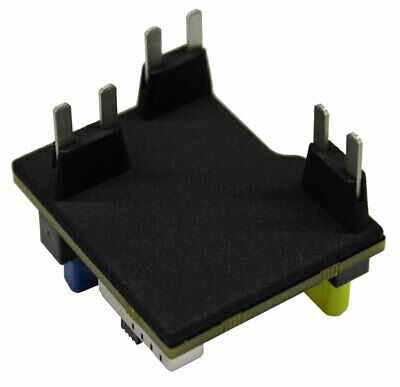
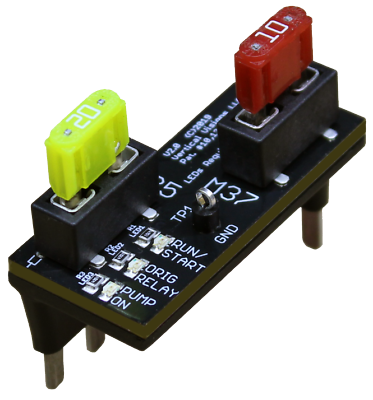
TIPM Plug-In Fuel Pump Power Bypass/Test System (Isometric View)
30 Day Return Policy
Money back guarantee (return for a full refund, less shipping, within 30 days of receipt if you're not satisfied or it does not solve your problem). We are not like your local dealer where parts that don't solve your issue can't be returned. If you find that our part doesn't solve your issue or your problem is outside the TIPM, simply contact us for a refund.
Description
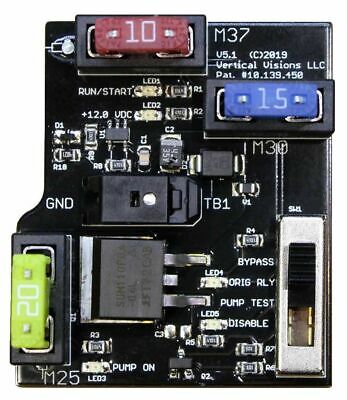
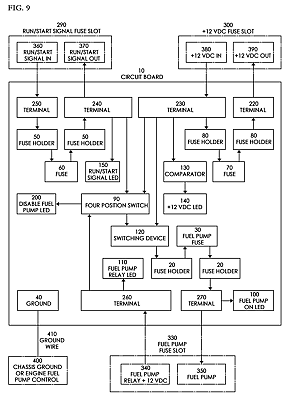
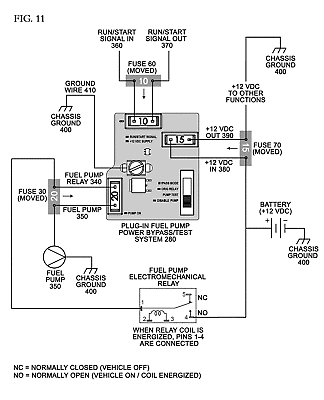
Designed around a printed circuit board with six terminals (male pins), this advanced system plugs into any TIPM-7 fuse box (see included image) to test and bypass a faulty fuel pump relay using Metal-Oxide Semiconductor Field-Effect Transistors (MOSFETs). The following electrical connections to the vehicle's fuse slots are used: +12 VDC power (M30), run/start signal (M37), fuel pump relay output (M25 far side), power output to the fuel pump (M25 near side), and ground. Installation requires no special skills and can be accomplished in 15 minutes with no vehicle downtime. Once the system is installed, your vehicle’s fuel pump will receive power with full remote start capabilities and no limitations.
Capabilities
Bypass your faulty fuel pump relay to stay on the road and drive like you normally do (prevents "stuck on" faulty fuel pump relays from draining your battery and will provide power to your fuel pump if the faulty fuel pump relay cannot)
Test your existing internal fuel pump relay with LED feedback to determine if it's faulty
Test your fuel pump when the vehicle is off (or drain the tank if the wrong fuel was used)
Disable the fuel pump (security mode) so no one can drive the vehicle
LED feedback identifies low battery voltage (<12.0 VDC) and indicates that it's correctly installed
Fits under your TIPM lid when closed
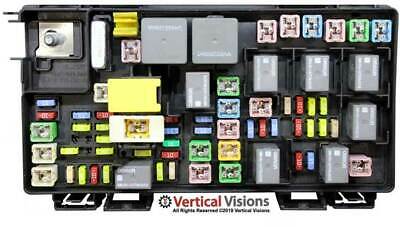
This TIPM Plug-In Relay System works exclusively on the TIPM-7 fuse box shown above.
Includes
TIPM Plug-In Fuel Pump Power Bypass/Test System v4
Ground wire with ring and fork terminals
Low profile 30 amp and 40 amp cartridge fuses
Hard copy color installation manual
Telephone and email support
Warranty
Two years parts and labor warranty. We'll also pay to ship the part both ways for any warranty claims.
Advantages
Best long term solution for a faulty fuel pump relay
No functional limitations
No cold start problems
No programming or expensive dealer visits
Eliminates the need for a used TIPM, repaired TIPM, or external relay
Removes power to the fuel pump after a crash
Full remote start functionality
No special skills required for installation
TIPM Plug-In Relay System Instructions
Incompatibilities
If you allowed your dealer to install an external relay by cutting wires under your TIPM
per the recall for 2011-2013 Dodge Durango and Jeep Grand Cherokees, this plug-in system will not work. Ebay won't allow us to post links on how to identify an external fuel relay, but our company website has photos and details.
Must be used with a TIPM-7 series fuse box. See our applicable vehicle list below to confirm if this part will fit. It's normal to have mini-blade and cartridge fuses in different locations on this style TIPM, depending on your vehicle options and model.
Limitations
None
Documentation
Instructions for our TIPM Plug-In Fuel Pump Power Bypass/Test System are available online, but Ebay won't allow us to post links here. A printed color copy of these instructions is included with each order.
Applicable Vehicles
2011-2013 Dodge Durango
2011-2013 Jeep Grand Cherokee
2008-2018 Dodge Grand Caravan
2011-2012 Dodge Ram 1500 or 2500
2011-2012 Dodge Ram 3500
2008-2016 Chrysler Town and Country
2009-2012 VW Routan
2007-2016 Jeep Wrangler
2009-2010 Dodge Journey
2007-2012 Jeep Liberty
2007-2011 Dodge Nitro
Other Dodge/Jeep/Chrysler vehicles between 2007-2018 using a TIPM-7 fuse box may work, but have not been tested yet.
Operating Modes
The four position silver switch (SW1) provides the following functionality:
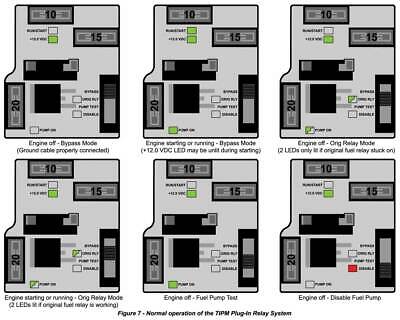
Bypass Mode
- Use this mode for normal driving to bypass the fuel pump relay inside your TIPM. It uses the vehicle's run/start +12 VDC signal at the M37 fuse terminal to provide power to the fuel pump via the onboard MOSFET.
Original Relay
- Use this mode if you want to test the fuel pump relay inside your TIPM or allow it to drive the fuel pump. This switch position uses the original +12 VDC fuel pump relay output from the upper M25 terminal to provide power to the fuel pump via the onboard MOSFET. A green "ORIG RELAY" LED will be illuminated when the +12 VDC signal supplied via the original fuel pump relay is detected. If the original fuel pump relay +12 VDC signal is intermittent or not present (an indication it’s faulty), this green LED and power output to the fuel pump will mimic it.
Fuel Pump Test
- This switch position permits the user to test the fuel pump when the vehicle is on or off in order to confirm proper electrical operation. This mode can also be used to drain/service the fuel tank by pumping fuel out when the vehicle is off. When placed in this mode, +12 VDC is provided to the fuel pump via the onboard MOSFET. You should be able to hear your fuel pump operating by listening for a pumping/motor sound with your ear close to the fuel tank in a quiet environment.
Disable Fuel Pump
- This switch position completely disables power to the onboard MOSFETs and the fuel pump, serving as an anti-theft device. A red LED is illuminated to indicate the fuel pump is disabled
LED Feedback
The circuit board contains five LEDs that provide feedback to the user. These LEDs draw very little current, so they won't drain your battery if illuminated when the vehicle is off.
Green
RUN/START LED - Turns on when the +12 VDC run/start signal is available across the M37 fuse, which indicates the engine is starting or running. +12 VDC power is supplied to the fuel pump if the switch is in bypass mode and this LED is illuminated.
Green
+12.0 VDC LED - Indicates the ground wire is properly connected and +12.0 VDC or greater battery supply is available as the main power source. This LED should be on all the time, unless the ground wire is not properly connected or the battery is less than +12.0 VDC. In some vehicles, this LED will not be illuminated during engine cranking due to a temporary voltage drop, which is normal. When the vehicle is powered off, this is the only LED that is illuminated.
Green
ORIG RLY LED - Will be illuminated when the +12 VDC signal supplied via the original fuel pump relay inside your TIPM is detected and the switch is in the Original Relay position. If the original fuel pump relay +12 VDC signal is intermittent or not present (an indication that it’s faulty), this LED and the power supplied to the fuel pump will mimic it. LED feedback is used to determine if the vehicle's original fuel pump relay is faulty.
Red
DISABLE LED - When the switch is in the DISABLE position, a red LED will be illuminated showing the user that the anti-theft fuel pump disable mode is selected. No power is provided to the fuel pump and the vehicle will not start.
Green
PUMP ON LED - If power is present at the M25 20 amp fuse and to the fuel pump, this LED will be illuminated. If no light is present, no power is provided to your fuel pump. If your vehicle will not start while this LED is illuminated, you may have a fuel pump or other problem.
Installation Instructions
Step 1
- Turn vehicle off and remove your negative battery terminal to disconnect power to the TIPM. This will prevent accidental short circuits.
Step 2
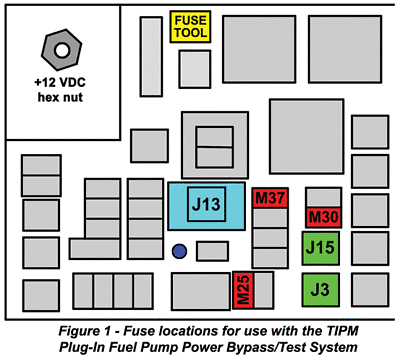
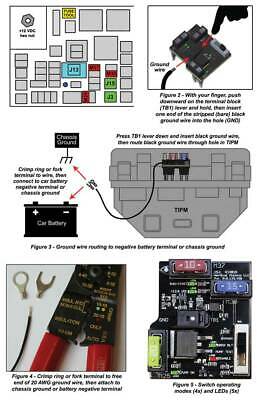
- Using the mini-blade/cartridge fuse removal tool located near the top of your TIPM (see Figure 1 - shown in
yellow
), remove three existing mini-blade fuses M25, M30, and M37 (see Figure 1 - shown in
red
). Insert the three fuses into the corresponding fuse slots in the circuit board.
Step 3
- Using the mini-blade/cartridge fuse removal tool, remove two cartridge fuses J3 and J15 from your TIPM (see Figure 1 - shown in
green
). Replace these two cartridge fuses with the equivalent low profile cartridge fuses included with your shipment. Make sure the fuse amp ratings are identical after replacement. For example, remove your J15 40 amp cartridge fuse and replace it with the included 40 amp low profile cartridge fuse. The included low profile cartridge fuses allow the circuit board to fit in your TIPM. Note that some vehicles, such as the Dodge Ram, contain only one cartridge fuse that needs replaced (J15) since J3 is empty.
Step 4
- Insert the circuit board into the TIPM so the six male terminals slide into the M25, M30, and M37 fuse slots at the same time. If required, lift up the J13 fuse bezel approximately 1/4" (see Figure 1 - shown in
light blue
). J13 is your Ignition Off Draw (IOD) fuse, which is normally used to prevent battery drainage when the vehicle is not driven for many weeks. The circuit board is fully inserted when the top of the yellow M25 fuse is nearly flush with the Omron grey plug-in relay located directly to the left. Close and then open the TIPM lid to ensure the circuit board is fully seated. The lid should close normally.
Step 5
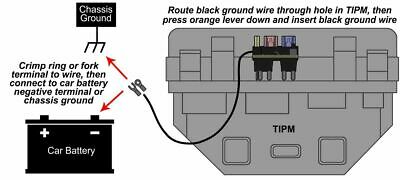
- The included black ground wire must be connected from the circuit board's green ground terminal (TB1) to your vehicle's chassis ground or negative battery terminal. Chassis ground is any conductive connection between the vehicle frame and the car battery's negative terminal. Push the orange lever down on the green ground terminal and simultaneously insert one stripped end of the black ground wire into the opening (see Figure 2). Release the orange lever and pull on the black ground wire to make sure it is secured.
Step 6
- Straighten the free end of the ground wire and insert it through the
blue
hole in the TIPM shown in Figure 1. The wire will exit under the TIPM where it can be retrieved. Using a crimping tool or pliers, attach the included ring terminal to the free end of the 20 AWG black ground wire as shown in Figures 3 and 4. The included fork terminal can be used instead of the ring terminal in situations where the chassis ground screw can only be loosened. The ring or fork terminal can then be connected to the vehicle's chassis ground or negative battery terminal to complete the connection. See Figure 3 for details.
Step 7
- Reconnect your vehicle's negative battery terminal and you're ready to use the circuit board to test your existing fuel pump relay, test your fuel pump, bypass a faulty fuel pump relay, or put the system into security mode to prevent it from starting. When the ground wire is properly connected, a green Light Emitting Diode (LED) labeled +12.0 VDC will illuminate. This LED confirms that the vehicle has a battery voltage of +12.0 volts or more and the circuit board is connected properly. If the LED is not illuminated, change or check your ground connection and verify your battery is fully charged. Installation is now complete.
Frequently Asked Questions
1) After installation, a "NO FUSE" light is illuminated on my instrument panel. Can it be remedied?
Answer: Yes. Simply push down on your J13 fuse (with white bezel). This fuse is sometimes lifted up during the installation of the TIPM Plug-In Relay Circuit Board and it must be pushed down when complete. J13 is your Ignition Off Draw (IOD) fuse that is normally lifted up to prevent battery drainage during long periods of time where the vehicle is not used (ie. while at the airport during long vacations). Push it down all the way and all should be fine.
2) When I turn my car off, the "+12 VOLTS" green LED is still lit. Is this a problem?
Answer: It's quite normal. This LED indicates your battery has at least +12 VDC and sufficient battery power to start the car. The LED draws very little current and will not drain your battery. Many vehicles have other LEDs that are lit when the vehicle is off, such as a red security light, which is completely normal.
3) The "+12 VOLTS" green LED was illuminated when I first installed the part, but now it's out when the vehicle is off. What might be wrong?
Answer: The green ground wire likely has a bad connection to chassis ground or the battery negative terminal. Verify that the green ground wire is connected to a bare metal chassis ground connection (no paint). This adjustment can be performed while the battery is connected to help you find the correct connection. The "+12 VOLTS" green LED will illuminate when properly connected. If you cannot get this LED to illuminated, you may have a battery that is less than 12.0 VDC. Verify battery voltage with a multimeter, if possible.
4) The fuel pump relay inside my TIPM is faulty and stuck in the on position (draining my battery). When I install the TIPM Plug-In Relay System, will this present a problem?
Answer: Not at all. Our system is designed to completely disconnect a faulty fuel pump relay from the fuel pump circuit. If you move the device's switch to "bypass mode", the old faulty relay is not connected to the fuel pump in any way. However, our device can optionally use the original faulty relay to drive the fuel pump, if you so choose. The "ORIG RELAY" switch position is often used for testing purposes where a green LED can provide feedback indicating whether or not the faulty fuel relay is providing +12 VDC to the fuel pump.
5) My car still won't start after installing your system. What should I check?
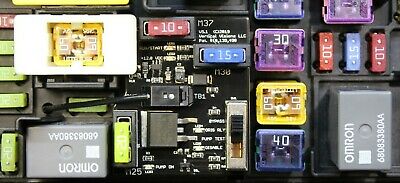
Verify the Ignition Off Draw (IOD) J13 fuse with a white bezel around it is pushed down all the way. This fuse is shown in images above and below. During installation, this fuse may have been lifted up slightly to allow for installation of the TIPM Plug-In Relay System.
Confirm that you replaced your taller J15 and/or J3 cartridge fuses (shown in yellow in above image) with the lower profile versions provided in your shipment. Many Dodge Ram vehicles will not have a J3 fuse installed. Your HVAC system will not work if you fail to install one of these fuses.
Visually check the three fuses (M25, M37, and M30) that were removed from your TIPM and inserted into our TIPM Plug-In Relay System to ensure they're not blown.
With the vehicle off, you should only see the green 12 VOLTS LED illuminated. This LED indicates that your ground wire is attached properly to the negative battery terminal or chassis ground. It also indicates that you have at least 12.0 VDC present in your battery. If no LEDs are illuminated, reconnect your green or black ground wire or confirm that your battery voltage is at least 12.0 VDC.
Have you checked your fuel pump to confirm it is working? Move the switch to the PUMP TEST position. In this position, you should see the green PUMP ON LED illuminate, indicating that 12 VDC power is being delivered to the fuel pump. You can also hear the fuel pump if the vehicle is located in a quiet environment.
Verify that you see the three green LEDs indicated in the below image during the engine cranking process. The most important thing to remember is that illumination of the green PUMP ON LED is the ultimate goal in delivering 12 VDC power to your fuel pump. If this LED is illuminated, the TIPM Plug-In Relay System is working properly and the problem is likely elsewhere within your vehicle.
An obvious question, but we have to ask.......do you have gas in the vehicle? Is your fuel gauge working properly?
Make sure you don't already have an external relay installed. If you do, change the external relay. If you allowed your dealer to cut harness wires under the TIPM, our TIPM Plug-In Relay System will not work.
A fuel pump pressure test is one additional item to check.
Check/replace your camshaft and/or crankshaft sensors. There are dozens of things that can prevent a vehicle from starting, beyond the fuel pump relay issue that our TIPM Plug-In Relay System was designed to solve.
6) My remote start isn't working or the vehicle shuts down after a few seconds when using remote start. What causes this?
Answer: Our TIPM Plug-In Relay System works perfectly with remote start and we often find that these types of problems are the result of the vehicle disabling remote start capabilities before or after the starting process. Most vehicles will disable remote start if all of the following conditions are not met:
Check engine light not illuminated
Shift lever in PARK
Doors closed
Hood closed
HAZARD switch off
BRAKE switch inactive (brake pedal not pressed)
Ignition key removed from ignition switch
Battery at an acceptable charge level
Remote keyless entry PANIC button not pressed
Fuel meets minimum requirement
The engine can be started two consecutive times (two 15-minute cycles) with the remote keyless entry transmitter. However, the ignition switch must be cycled to the ON/RUN position before you can repeat the start sequence for a third cycle. With the TIPM Plug-In Relay System in place, remote start problems are normally attributable to one or more of the items listed above if you can start your vehicle with a key or pushbutton, but not with the keyfob.
7) How do I connect the one ground wire that is needed for the circuit board to function?
Answer: The ground wire is connected between the grounding stud on the circuit board (the device) and any chassis ground connection on the vehicle. Start by disconnecting your battery, then feed the green ground wire through the prescribed hole in the TIPM where it will emerge on the bottom side. You'll attach a ring or fork terminal (included) to the chassis ground end of the wire by crimping it (with crimps or pliers). Then you'll find a good chassis ground connection, which can be any bolt that screws into the frame of the vehicle. Many vehicles also have a true chassis ground stud located near the TIPM that is a perfect connection point. Either way, finding a chassis ground is easy and we can help you locate one on your vehicle if needed. We include both ring and fork terminals to facilitate this. Then, you simply insert the other end of the ground wire into the grounding stud on the circuit board and tighten it with a flat head screwdriver. Both ends of the chassis ground wire are wetted (ie. contain solder to prevent the stranded wire from unwinding). Once you reconnect the negative battery terminal, you'll know if your chassis ground connection is adequate when the green LED labeled "+12 VDC" on the circuit board lights up. This LED indicates that your battery contains a voltage of at least 12 VDC. You can also slide the switch into the "DISABLE" position and a red LED should light up, indicating that the circuit board will not deliver power to the fuel pump and vehicle will not start. These are two great indicators that you've properly connected the ground wire. Normal installation time should be less than 15 minutes. We're currently working on a video that will help explain the chassis ground connection in more detail.
8) When I turn the key or push the starter button, nothing happens. Sometimes my vehicle stalls while driving and I lose all power. Is this part at fault?
Answer: No. When a vehicle has no power or starter activity, then it's normally an electrical issue elsewhere in the vehicle. Our part simply delivers power to the fuel pump and does not affect the starter's ability to rotate the engine via the flywheel or deliver power to the entire vehicle. We might suggest the following:
Verify proper battery voltage when at rest (12.5 VDC normally) and while running (14.0 VDC roughly).
Verify that battery cables are securely connected with no corrosion.
Your starter could be the problem if no activity occurs when you turn the key or push the starter button, as we experienced a similar issue with our test vehicle (2011 Durango).
Check starter relay on top of TIPM. Swap it with a similar to relay to see if things change.
Try your alternate key fob. The original key fob might have low battery voltage and the vehicle won't start due to not detecting it.
Shipping
Our goal is to ship your parts as fast as possible. We normally ship the same day if we receive your order in a reasonable amount of time before our FedEx pickup or USPS drop off. If your order arrives late in the day, we'll ship it the next business day. We understand and will accommodate those who need these parts as fast as possible. We have a contract with FedEx for discounted 2-day shipping, so that's likely going to be your best domestic shipping option.
Our shipment schedule is: FedEx - Monday through Friday (pickups at 3pm). If using FedEx and you require a package to be delivered on Saturday, you MUST choose 2-Day Special One Rate (note that FedEx will not deliver to some addresses on Saturday). USPS - Monday through Friday (dropoffs at 3pm).
Estimated shipment durations:
FedEx Priority Overnight: 1 day,
FedEx Standard Overnight: 1 day,
FedEx 2-Day: 2 days,
FedEx International Priority: 1-3 days,
FedEx International Economy: 2-5 days, USPS 1st Class: 4-10 days,
USPS Priority Mail: 2-3 days,
USPS Priority Express Mail: 1-2 days,
USPS Priority International: 6-10 days,
USPS Priority Express International: 3-5 days,
USPS First Class International: 1-2 weeks. Since most carriers have removed their delivery guarantees, we can't guarantee delivery dates.
The shipping duration estimates shown below begin at the time and day the package is shipped by us. Orders received before 12pm ET weekdays will normally be shipped the same day. Orders received after these time periods will likely still ship the same day, but this is not guaranteed.
Packages are delivered:
FedEx - Monday through Friday (Saturday deliveries for most 2-Day Special One Rate shipments only),
USPS - Monday through Saturday
Order confirmation emails are sent minutes after each order is placed. Tracking emails are sent when the order ships. FedEx can't ship to a PO Box or deliver 2-day packages to Puerto Rico, so we'll use USPS Priority Mail in these situations.
Lost Packages
Although rare, USPS and FedEx occasionally delays or loses packages. If your shipment is delayed or lost, please contact us and we'll try to locate your package or ship another part. If you file an Ebay claim due to a lost/delayed package, please be aware that Ebay immediately removes the funds from our account and we won't risk sending you a second part. Communication is key, so contact us through Ebay or call us at 304-933-9391 with any questions or concerns you may have. Ebay will not be able to help you as much as we can, so contact us if you have any problems.
Filing a Claim
Many Ebayers game the system by using our parts for testing purposes, then filing a claim that the part doesn't work. In this situation, Ebay requires us to pay for return shipping and issue a full refund. We obviously don't like this. If our part is indeed faulty, simply contact us and we'll send another one to you. If you have another issue with your vehicle outside the TIPM that our part isn't intended to fix (ie. your starter won't turn the flywheel), then please do not claim that our part is faulty. We will require additional details from every faulty part claim before complying with a return request.
Telephone/Email Support
We're a small business (Vertical Visions LLC) located in Eldersburg, MD since 2001. Feel free to call us with any questions you may have. We're open from 10am-6pm ET weekdays. The owner (Jason Bell) is a mechanical engineer with 26 years of engineering experience. Email is another great option if our phone lines are busy. We fully support all our products.
